I didn't get my engine assembled before my holiday to China, so I have something to look forward to when I get back.
If you are interesseted, and can read danish, you can follow my travel blog at http://emil-i-kina.blogspot.com/.
If not, then you can look forward to new and exciting stuff, as I return in may.
Sunday, March 16, 2008
Thursday, March 6, 2008
Catch up
I have been quite busy, so here is a quick catch up on the project.
While I have been waiting for the OEM parts, I have been busy sanding down my fairing and the tank as preparation for some paint. It is tedious and time consuming, but I hope the end result will be worth it.
I have also removed the rear swing arm, to clean it and lube the bearings.
The Yamaha OEM parts arrived Friday, and everything was okay, except for the crankshaft bearings. The bearings I received are the tightest ones, and I need the loosest ones. The dealer promised to ship them express, so I hope they will arrive before my holiday.
Quick list of things I have done:
A mold of an intake port.
Refurbished the water pump.
Assembled the cylinder head.
Checked and adjusted the valve clearance.
Changed the gearbox bearings.
Cleaned and installed the gearbox.
Changed the strainer on the oil pickup.
I have photos and detailed descriptions coming real soon now.
Thursday, February 14, 2008
Short up
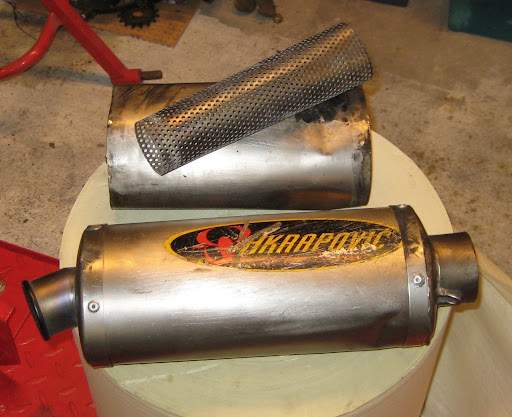
A quick picture of my new short stub exhaust. It was quite easy. I drilled out the rivets and pulled the intake end cap out. The inner pipe is attached to the intake end cap, so it came out as well. The can is filled with glass wool, so be smart (unlike me) and wear some good gloves, else you can look forward to two days of itching hands. Once I had the can disassembled, I took the angel grinder to both the can and the inner pipe. After that I assembled the short can, and drilled holes for the new rivets. Some riveting later, and presto! A new fanzy short stub Akapovic end can.
Wednesday, February 13, 2008
Up close
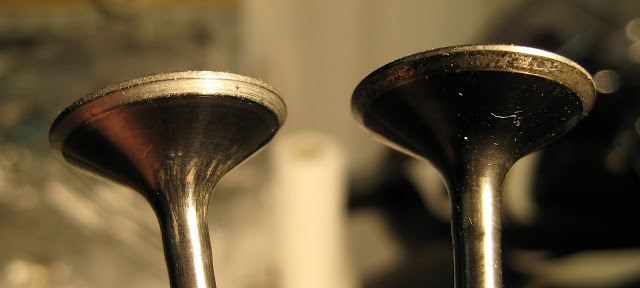
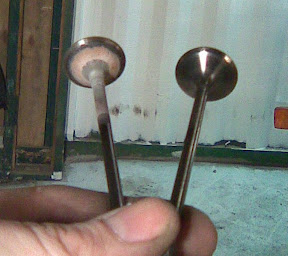
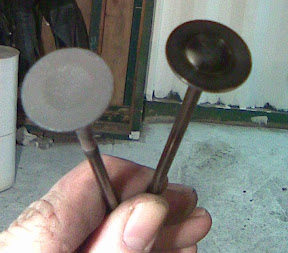
Here is a close up of a lapped and unlapped valve. As you can see, not running an airfilter comes at a price!
Camera galore
Yeasterday I celebrated my 29th birthday by buying a camera. I went with a Canon Ixus 75, since they are quite cheap, and in the past I have been pleased with the Ixus 50 and Ixus 55 models. They are easy to handle and take nice pictures, their only flaw is that I tend to forget them in trains and parks. I hope this camera will last a little longer than the last two in that respect.
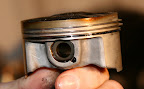
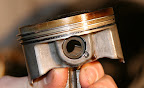
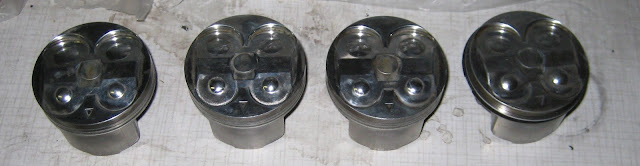 My new camera was put to good use immidiatly. First up is some pictures of the newly polished pistons. The polishing revealed just how much the valves have been touching the pistons, especially piston nr. 2 have had a lot of contact with the exhaust valves, as can be seen on this closeup.
I also took the time to pull the suspension, both the rear shock and the front forks. I am sending them to Michael Graversen at Hyperpro so he can give them a full maintanence. I need a new and softer spring for the rear shock, and new springs for the front. Michael will also give them a cleaning, new oil and new oil seals.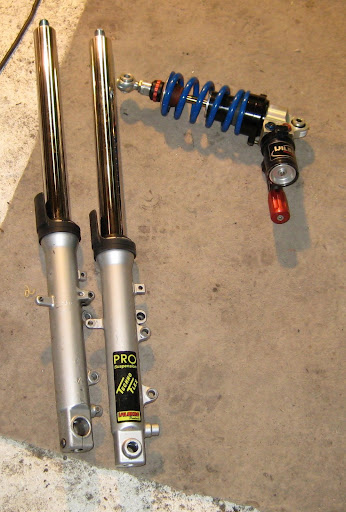
My new camera was put to good use immidiatly. First up is some pictures of the newly polished pistons. The polishing revealed just how much the valves have been touching the pistons, especially piston nr. 2 have had a lot of contact with the exhaust valves, as can be seen on this closeup.I also took the time to pull the suspension, both the rear shock and the front forks. I am sending them to Michael Graversen at Hyperpro so he can give them a full maintanence. I need a new and softer spring for the rear shock, and new springs for the front. Michael will also give them a cleaning, new oil and new oil seals.
Wednesday, February 6, 2008
Bling Bling!
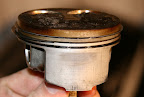
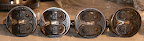
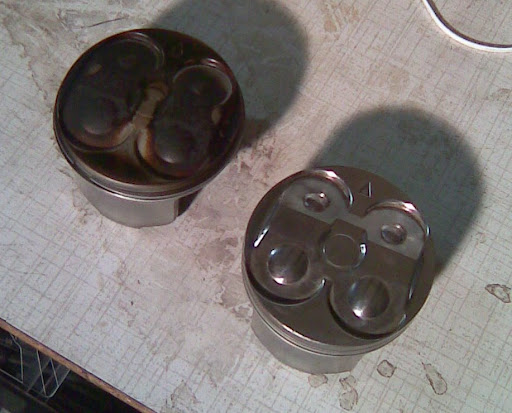 My polishing spree continued this week, and I polished one of the pistons to a mirror finish. I figured it would be a good idea, and well, frankly it just looks damn good.
I did a search on Speed Talk to see if there is any performance gains with a polished piston/combustion chamber. The consensus seems to be that there is no benefit in polishing, but it won't hurt either. This thread has an indepth discussion of the topic.
I also lapped the valves. This took some time, but I am sure it will make a difference. The exhaust valves was quite pitted, and they must have been leaking a bit. The intake valves was in much better shape, but their seats was pitted. I guess the reason for this pattern is the difference in temprature. The exhaust valves get quite a bit hotter than the intake valves, and that is the reason why they pit, while the intakes doesn't.
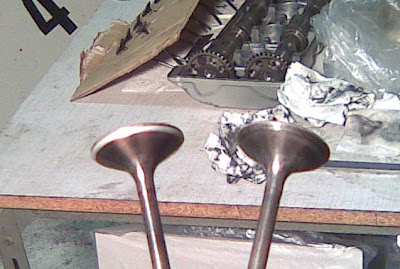 Left is a lapped and unlapped valve, my cameraphone won't take good enough pictures to show the pitting on the unlapped valve, but it is quite obviuos when you have it in your hand.
I had to lap the exhaust 2-3 times with the coarse lapping compund, and then finish them with one lapping with the fine compund. The intakes was easier and only required one time with each compund.
I also lapped the valves. This took some time, but I am sure it will make a difference. The exhaust valves was quite pitted, and they must have been leaking a bit. The intake valves was in much better shape, but their seats was pitted. I guess the reason for this pattern is the difference in temprature. The exhaust valves get quite a bit hotter than the intake valves, and that is the reason why they pit, while the intakes doesn't.
Left is a lapped and unlapped valve, my cameraphone won't take good enough pictures to show the pitting on the unlapped valve, but it is quite obviuos when you have it in your hand.I had to lap the exhaust 2-3 times with the coarse lapping compund, and then finish them with one lapping with the fine compund. The intakes was easier and only required one time with each compund.
Friday, February 1, 2008
Dirty shine.
My love for engine work has tanken a back seat the last few days. The doesn't mean I haven't been burning gasoline thou!
Last weekend I was out having fun with my Moto trials bike. I spent a few hours in storming rain on muddy hills, in deep trenches and got covered in mud as a reward.

Some of the guys had the new 4 stroke trial bikes, they look to be a very nice upgrade. So much easier to climb hills with them, just twist the throttle and go, no need to keep the engine up in the rew range.
Tuesday I was out having fun at the gocart track. Loads of fun, but the skills required to go fast is very different from what I use when I roadrace, I really have a lot to learn there.
When not burning gasoline, with or without oil, I have been polishing the cylinder head and the pistons. I don't know how effective this will be, but it sure looks good.
I have also been removing all of the carbon deposits on the valves, and there were a lot on them. The deposists at the bottom looked light brown, and I think that indicates that the engine has run on race gas. That would explain the very low AF ratio I got when I had the bike on the Dyno.
Last weekend I was out having fun with my Moto trials bike. I spent a few hours in storming rain on muddy hills, in deep trenches and got covered in mud as a reward.
Some of the guys had the new 4 stroke trial bikes, they look to be a very nice upgrade. So much easier to climb hills with them, just twist the throttle and go, no need to keep the engine up in the rew range.
Tuesday I was out having fun at the gocart track. Loads of fun, but the skills required to go fast is very different from what I use when I roadrace, I really have a lot to learn there.
When not burning gasoline, with or without oil, I have been polishing the cylinder head and the pistons. I don't know how effective this will be, but it sure looks good.
I have also been removing all of the carbon deposits on the valves, and there were a lot on them. The deposists at the bottom looked light brown, and I think that indicates that the engine has run on race gas. That would explain the very low AF ratio I got when I had the bike on the Dyno.
Monday, January 21, 2008
More measurements
Yesterday I was at the shop and took some more measurements. Please note that these measurements were done with a vernier caliper, and are only for general reference, they are not very precisely done.
Intake valve: 25 mm
Exhaust valve: 22 mm (21,85 to be exact)
Main crankshaft bearing: 32 mm
Big end bearing: 30 mm
Piston diameter at the skirt: 65,4 mm
Top compression ring: 0,62 mm
Piston ring diameter: 15,85 mm
Crankshaft gear: 44 teeth
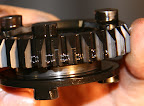
Clutch boss: 86 teeth
Gearbox gears (standard OEM numbers in parentheses):
Bridgestone Slick 180/64 R17 circumference (sligthly used): 2,02 m
Using these numbers and putting them in my little nifty calculator (use RRlog if you don't want to do it by hand) gives a top speed of 261 km/h at the end of the Anderstorp main straight, using a 15/49 secondary gearing and running the engine at 15000 RPM.
Intake valve: 25 mm
Exhaust valve: 22 mm (21,85 to be exact)
Main crankshaft bearing: 32 mm
Big end bearing: 30 mm
Piston diameter at the skirt: 65,4 mm
Top compression ring: 0,62 mm
Piston ring diameter: 15,85 mm
Crankshaft gear: 44 teeth
Clutch boss: 86 teeth
Gearbox gears (standard OEM numbers in parentheses):
| Gear: | Input shaft: | Output shaft: | Gearing: |
| 1 | 15 (13) | 31 (37) | 2,067 (2,846) |
| 2 | 21 (19) | 35 (37) | 1,667 (1,947) |
| 3 | 21 (18) | 29 (28) | 1,381 (1,555) |
| 4 | 25 (24) | 31 (32) | 1,240 (1,333) |
| 5 | 26 (21) | 30 (25) | 1,154 (1,190) |
| 6 | 22 (24) | 24 (26) | 1,091 (1,083) |
Bridgestone Slick 180/64 R17 circumference (sligthly used): 2,02 m
Using these numbers and putting them in my little nifty calculator (use RRlog if you don't want to do it by hand) gives a top speed of 261 km/h at the end of the Anderstorp main straight, using a 15/49 secondary gearing and running the engine at 15000 RPM.
Sunday, January 20, 2008
Visiting Jansberg
Saturday I woke up early, early in the afternoon. After a quick shower, I drove to the shop and set about loading the engine in the back up my car. Some towels to protect the parts, and some plastic to protect the seats secured the engine parts on the backseat. After a nice drive to Helsinge I ended up in the countryside at a small house, if it hadn't been for the workshop sheds next to the house, I would have been sure my GPS had failed me.
I parked the car and knocked on the door, Michael Jansberg came to the door and let me inside. I waited a bit in while Michael finished a new control computer for a 2200 Dynamometer for a Swedish customer. After putting the finishing touch on the computer and interface cards, Michael turned to me. He gave me the grand tour of his workshop, which is divided into several smaller areas. One area for port work, one for mill work, one with a dynamo meter and another for storage of various parts. While going thru the workshop he found various R6 engine parts, some used and some new that he put in a little pile.
After the tour, I fetched the head, crankcase, valves and pistons. Michael looked it all over and gave me a few tips and hints. His overall assessment of engine is that is in a good state. The pistons and bores are fine, and the valves and valve seats are fine. The pitting in the squish area is of no concern, and can be flattened slightly with some light sandpaper. The valves are "RSC" valves, so a replacement valve for the one stuck exhaust valve will be different (OEM). The piston rings are quite worn, which can be seen by the fully polished second compression ring. Michael wasn't impressed with the head work, which amount to a simple porting and decking. He hinted that I'll get some good result with some epoxy.
While we looked over the engine, we talked about high velocity tuning and other topics. Michael recommended the SpeedTalk message board, and I'm quite impressed with that place. It is full of insightful post regarding engine tuning.
I also need to change the main bearing on the input shaft of the gearbox, it has a rough spot. After looking over the engine, Michael gave me the R6 parts he had collected and sent me on my way home. I was most pleased with the visit, Michael is a very knowledgeable man, and he don't mind sharing his wisdom. He took an hour of his weekend and gave me free advice, I'm grateful and will send him a bottle of red grape juice.
Friday, January 18, 2008
Dish washing 2
Today I did some more dish washing. This time it was the crank, the crankcase and the valves. I washed it all in hot water and regular Ajax. The goo from the chain around the output axle was removed with lamp oil.
Tomorrow I have an appointment with Michael Jansberg, I'm looking forward to get his assessment on the state of the engine, and maybe get a few tuning tricks.
Tomorrow I have an appointment with Michael Jansberg, I'm looking forward to get his assessment on the state of the engine, and maybe get a few tuning tricks.
Thursday, January 17, 2008
Background
 A reader suggested that I post a little background info. Like what kind of engine I'm rebuilding, and why.
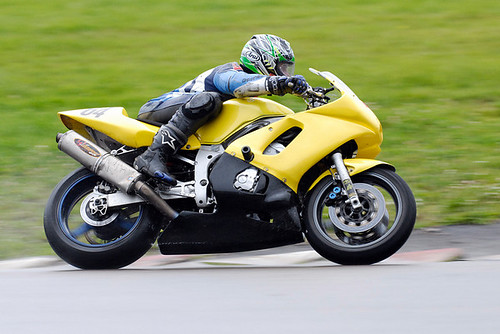
The engine is from my racing motorcycle, a Yamaha YZF-R6 from 2000. I purchased the bike from another danish road racer at the end of the 2006 season. I used the bike for the 2007 season, racing in the danish rookie championship and running at various trackdays. The engine is supposed to have a V&M SuperSport tuning and in the spring of 2006 a Sigma slipper clutch was installed.
I'm rebuilding the engine for two reasons. First of all it had a high oil consumption, ½-1 liter for a race weekend. Second, I had it on a dynometer and the result was quite disappointing. It had 103 rwhp, on a dyno that measures a stock 2006 R6 at 101 rwhp. My goal is to have 110 horse at the fat rubber, at least.
Tuesday, January 15, 2008
Dish washing
Today I talked a bit with Michael Jansberg (of WSS tuning fame). He gave me a few hints, and I can probably get him to take a look at the engine head, cylinders and pistons.
So as preparation for that, I went to the shop to take out the gearbox, and clean some parts up.
The gearbox came out nicely. It is, strangely, the only place in the engine where you need a torx key (size T30). The main bearing on the drive shaft seems to have a rough spot, so I might need to change it.
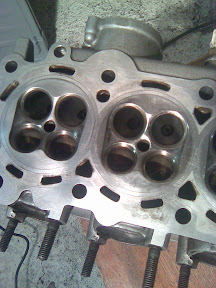
I used some regular detergent to clean the valve cover, camshaft cap and head. It worked nice. To get rid of the remaining liquid gasket, I used Loctite 7200. Loctite really makes it a breeze (a stinking breeze thou) to remove gaskets, and it even took a lot of the soot/carbon deposits with it. Take a look at the difference:
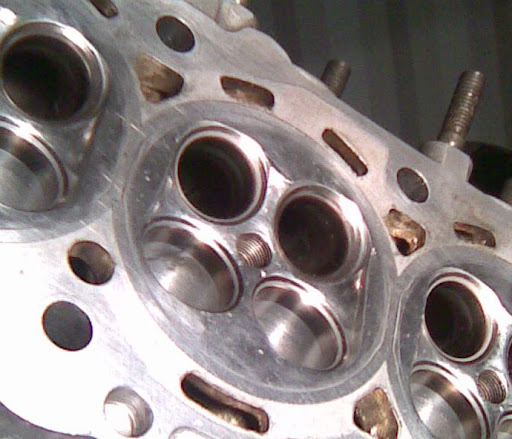
When I had cleaned the head, I noticed some pitting in the squish areas. I guess it's from running with no air filter, and I hope Mr. Jansberg have a few tricks to mend them.
I also took the pistons apart and cleaned them. The cross pin came right out, with out using a driver/puller or anything fancy.
So as preparation for that, I went to the shop to take out the gearbox, and clean some parts up.
The gearbox came out nicely. It is, strangely, the only place in the engine where you need a torx key (size T30). The main bearing on the drive shaft seems to have a rough spot, so I might need to change it.
I used some regular detergent to clean the valve cover, camshaft cap and head. It worked nice. To get rid of the remaining liquid gasket, I used Loctite 7200. Loctite really makes it a breeze (a stinking breeze thou) to remove gaskets, and it even took a lot of the soot/carbon deposits with it. Take a look at the difference:
When I had cleaned the head, I noticed some pitting in the squish areas. I guess it's from running with no air filter, and I hope Mr. Jansberg have a few tricks to mend them.
I also took the pistons apart and cleaned them. The cross pin came right out, with out using a driver/puller or anything fancy.
Sunday, January 13, 2008
Measurements
Today I went to the shop to take a few quick measurements and remove the stuck valve from the head.
The valve stems measured at slightly below 4 mm for both a random intake and random exhaust valve.
The valve lift was measured at (33,2 - 25,2) 8 mm for intake, and (32,7 - 25,2) 7,5 mm for exhaust.
Removing the stuck valve from the head was quite easy. I have bought some small grinding tips from Proxxon for my mini grinder, and they cleared the head just fine. So two minutes of grinding, and the valve was out.
I also removed the bearing shells from con rod nr. 3, there is some slight discolouration on the back of the bearing shells. I'll try to get a photo of it. The bearings are marked F-112 (the bearing type) and 050D (for size I guess).
Friday, January 11, 2008
Engine rebuild
This winter I'll be rebuilding my engine on the R6.
So far I have managed to dismount it from the frame, and dismantled most of the engine.
(Click on the pictures to get a full-res version)
If you want to see more pictures (some of them in very high resolution) then have a look at this album.
So far I have managed to dismount it from the frame, and dismantled most of the engine.
(Click on the pictures to get a full-res version)


The camshafts looks quite good, only minor wear on them, and no pitting at all.

The camshaft journals are fine, slight wear on the camchain side, but that is to be expected.
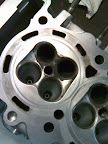
The intake ports are fine, and have been worked over once.- The exhaust ports are filled with carbon deposits.

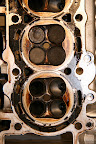
The combustion chamber is filled with carbon deposits. The enigne used quite a lot of oil, and it shows on the head and on the pistons.- The valves seems fine, but I need to take few messurments to get the valve stem to valve guide clearence. One of the exhaust valves in cylinder 3 won't come out. I guess the head has been hammerd flat because of a faulty hardning. The valves also need a good cleaning, lots of carbon deposits.
- The camchain was quite used, so a new one will do wonders.

The cylinders are good.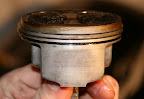
The pistons looks good, only minor scuffing on the skirts. But a lot of carbondeposits on the crown.
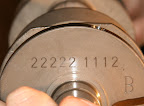
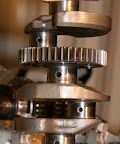
The crank is fine, and all the bearings looks good. One thing that puzzled me is that the crank bearings are the widest size (green) where they should have been two sizes tighter (black). I guess the reasoning is reduced friction from the bearings.- The connecting rod big end bearings are fine, a little blank here and there, but not much wear.
- The oil pump had to have the chain cut to be removed, so a new chain will get installed. Besides from that, the oil punp seems fine.
- The oil pickup strainer had quite a few metallic particles in it.
- The water pump is corroded, from either cavitaion or running plain water (ups).

The clutch basket and boss has some indentions from the cluthplates. I might smooth them out.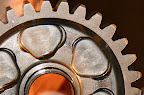
The gears looks good, but I still need to remove the lower shaft, and disassmeble both the shafts.
If you want to see more pictures (some of them in very high resolution) then have a look at this album.
Subscribe to:
Posts (Atom)
